
IMPORTANT NOTICE : Since 2020, we no longer display charts shown below as the Demark Setup methodology we discuss below has been replaced with a far superior Trendex methodology. You can read about our proprietary Trendex Multi-Stop & Probability methodology over here : Trendex Market Timing/Risk Management
PREAMBLE
A detailed 18-year analysis reveals that the DeMark Setup indicators are suitable for the detection of market tops and bottoms on the SP-500 Index. We have made some modifications to the original algorithms to achieve better performance and to this end, we feel we have something that is statistically significant enough to provide a distinct edge in the markets. We also introduce a new live chart we publish for subscribers to keep them appraised of DeMark opportunities.
A. INTRODUCTION
The technical analysis indicators developed by Tom DeMark enjoy a reputation for reliability amongst its small group of market users that exceeds that of the average price or volume indicator. DeMark remains one of the lesser-known market indicators and is seldom covered in technical analysis syllabi or textbooks. This is largely because DeMark availability has been confined to the professional market and its reputation has spread mainly by word-of-mouth. Consequently, DeMark enjoys a certain degree of exclusivity and so is not yet part of mainstream technical analysis theory.
A recent independent back-test of the DeMark Sequential signals showed them to be around 70% accurate across a broad range of instruments. DeMark is essentially a risk-reward strategy and its stop loss positioning means that even when the indicators occasionally under-perform, losses are cut to a minimum. The Sequential is perhaps the most commonly used DeMark indicator and has an impressive record of identifying and anticipating turning points across the FX, bond, equity and commodity markets. The Sequential Indicator identifies when a trend is becoming, or has become, exhausted. On daily charts, for example, DeMark identifies precisely which day to enter into a new position or liquidate an existing one. This total absence of ambiguity with regard to market timing makes the Sequential stand out.
B. MECHANICS
The TD Sequential Indicator consists of two patterns, a TD Setup and a TD Countdown. We have not implemented the Countdown phase on our analysis as we have not found it accurate enough for our needs. We have taken the algorithms described in Jason Perle’s reference work “The DeMark Indicators” and back tested the TD-Setup indicator over 20 years of historical SP-500 Index data.
The basic DeMark BUY-SETUP consists of the following:
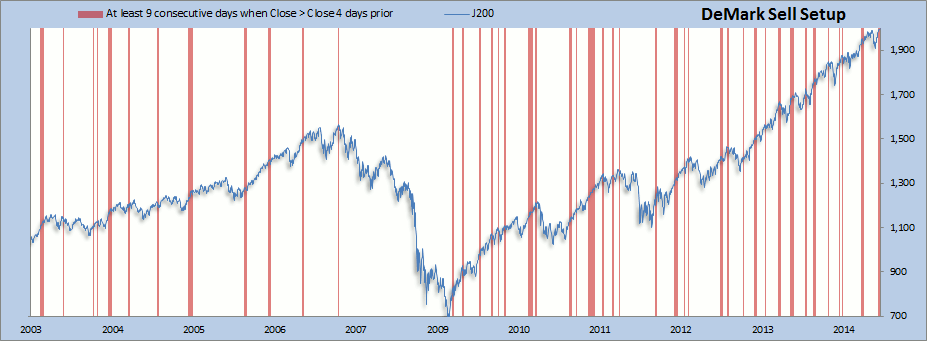
- Prerequisite is a bearish price-flip, indicating a switch from positive to negative momentum. This is when the close today is less than the close 4 days ago, but the close yesterday was higher than the close 4 days before.
- After a bearish price-flip, there must be at least nine consecutive closes, each one less than the corresponding close four bars earlier.
- Cancellation – If at any point a bar closes higher than the close four bars earlier (a bullish price flip) the setup is canceled and we are waiting for another bearish price-flip
- BUY Signal occurs when there is a cancellation after at least nine consecutive closes, each one less than the corresponding close four bars earlier
The basic DeMark SELL-SETUP consists of the following:
- Prerequisite is a bullish price-flip, indicating a switch from negative to positive momentum. This is when the close today is greater than the close 4 days ago, but the close yesterday was lower than the close 4 days before.
- After a bullish price-flip, there must be at least nine consecutive closes, each one more than the corresponding close four bars earlier.
- Cancellation – If at any point a bar closes lower than the close four bars earlier (a bearish price flip) the setup is canceled and we are waiting for another bullish price-flip
- SELL Signal occurs when there is a cancellation after at least eleven consecutive closes, each one more than the corresponding close four bars earlier
After a setup reaches its optimal threshold count values (9 for BUYS or 9 for SELLS), a market reaction in opposite direction has a higher probability during the next 1-5 bars. Note that a setup does not guarantee a reaction in the opposite direction-for instance, if momentum is too strong in the trend direction, a reaction may be muted. A sideways move or continuation of the trend following a setup indicates a weaker setup. In general therefore, the higher the set-up count achieved the higher the probability of success. This is why it is good to employ strong risk management when trading setups (i.e. stops.)
C. THE BUY-SETUP ANALYSIS
An 18-year analysis of the distribution of some 509 BUY Setup Counts for the SP-500 since 1996 are depicted below:
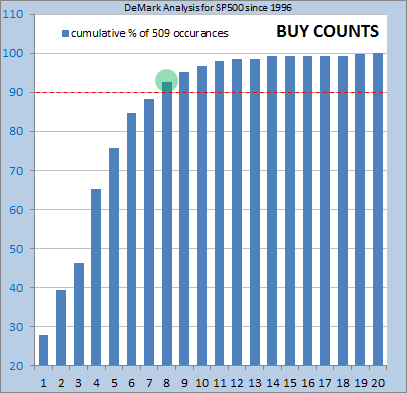
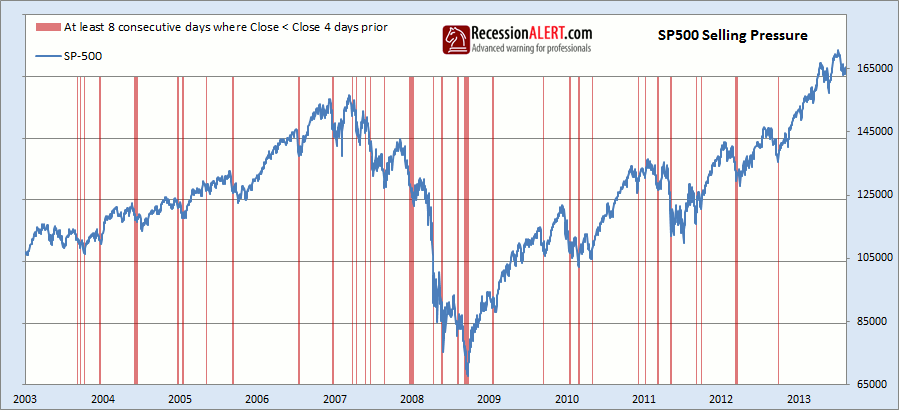
Whilst the original DeMark methodology calls for counts of 9 to be used for the BUY Setup, the distribution above shows that a count of 8 is likely more optimal for the SP-500 Index. Firstly, it places the event in territory that occurs less than 10% of the time and secondly, the number 8 lies on the “sweet spot” of the distribution curve, where a tangent line is exactly 45 degrees. Of course, the higher the Setup count the better the opportunity – but for our purposes we will become interested in all counts of 8 or more. These instances are so good at pinpointing major troughs that they have been included into our Selling Pressure Diffusion Index as depicted below:
D. THE BUY-SETUP SUMMATION
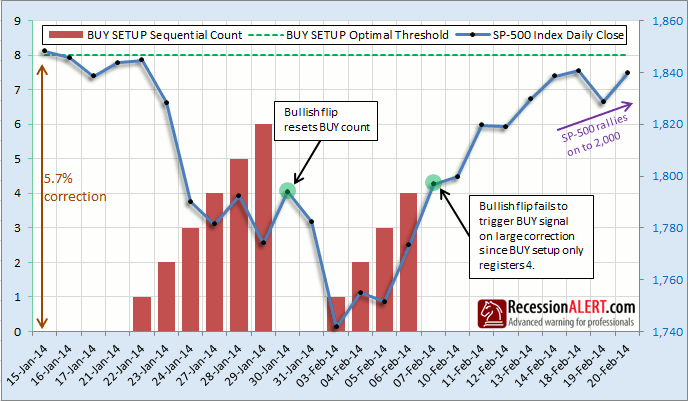
Whilst the chart above shows that the BUY-SETUP offers respectable trough signals, we observed an Achilles-heel for the BUY-SETUP indicator. On many occasions a SP-500 correction would ensue with the BUY-SETUP count rising accordingly. Then for 1 or 2 or even up to 3 occasions in the correction, we would observe a bullish price flip (SP-500 closes higher than 4 days prior) which would then reset the BUY-SETUP count to zero. These short-lived rallies in an ongoing correction would result in the correction eventually bottoming out with a BUY-SETUP count registering less than the required 8 and we would fail to generate a buy signal on what was otherwise a rather respectable correction. A classic example of this problem appears below:
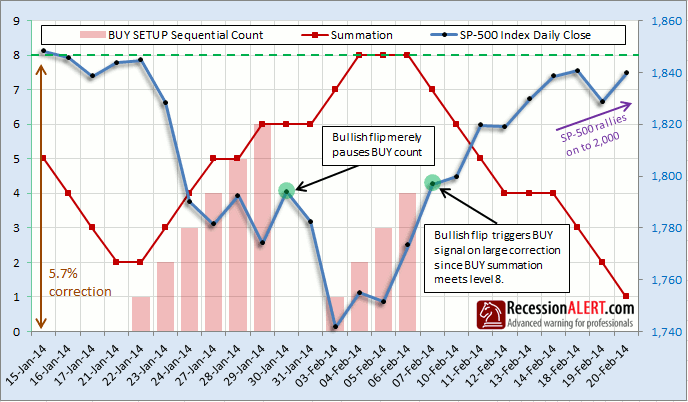
To counter this problem, we found that a summation of BUY setups as opposed to a sequential count, worked rather well. In this instance we are counting the frequency of occurrences when the SP-500 is less than 4 days prior as opposed to the number of uninterrupted such occurrences:
There are two way to use the Summation to trigger BUY signals.
- The first, is to act on bullish flips provided the Summation meets or exceeds 8.
- The second is to only trigger BUY signals when the Summation falls below +8.
The first instance provides more timely entries, but a few more premature signals. The second method provides later entries but less premature signals. The second method is thus recommended although we should be at pains to point out that the first method is no less inferior and merely caters to those with more risk appetite.
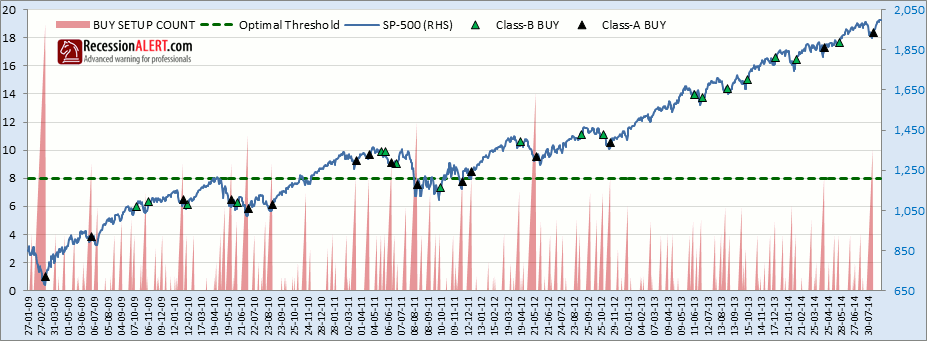
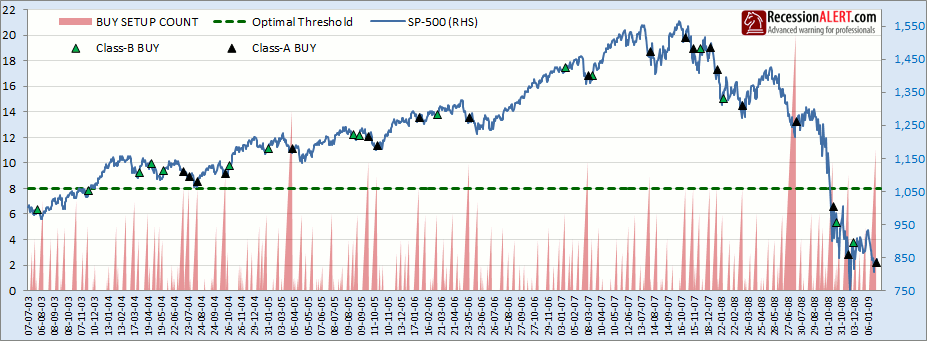
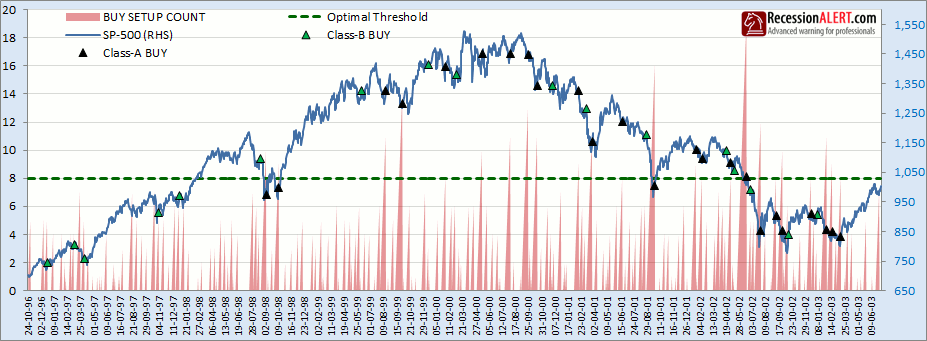
The summation method DOES NOT replace the standard DeMark BUY-Setup method. When you witness a standard DeMark BUY signal, when we have a bullish flip when the BUY Setup count is 8 or more, this should still be acted upon first as this is the highest-confidence trough detection method of the three. The only reason we have the Summation method to complement it is that the standard method, due to its cautious nature, may miss some very attractive opportunities. For this reason, we categorize our DeMark BUY signals as follows, in order of highest confidence first:
- Class-A BUY : Bullish flip when Setup-count >=8
- Class-B BUY : Summation drops below 8
- Class-C BUY : Bullish flip when Summation >8 (rare occurrences)
If you see a Class-A, then a Class-B by definition has to follow shortly after. In this instance you can view the Class-B as a “confirmation” for the Class-A. The typical strategy here might be the issuance of your first tranche of long trades on the Class-A followed by your second tranche on the Class-B a few days later. There are instances when the Class-A may be a day or three premature and the Class-B gets in at a lower price point. Similarly, if a Class-A is not present, you may witness 1 rare Class-C preceding the Class-B and you could also adopt a staged approach to funds deployment to lower risk.
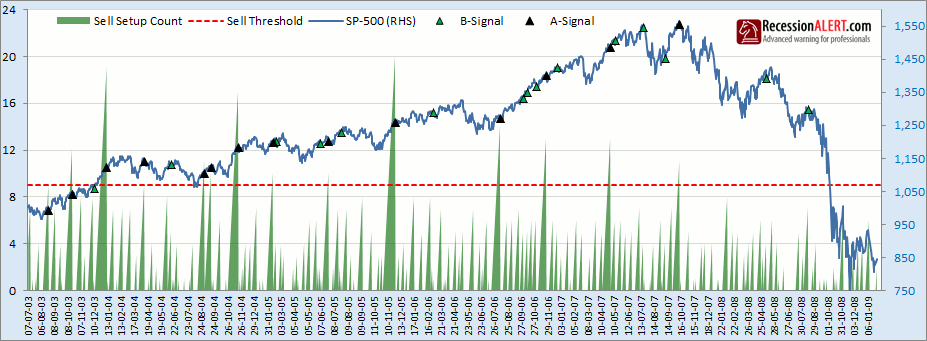
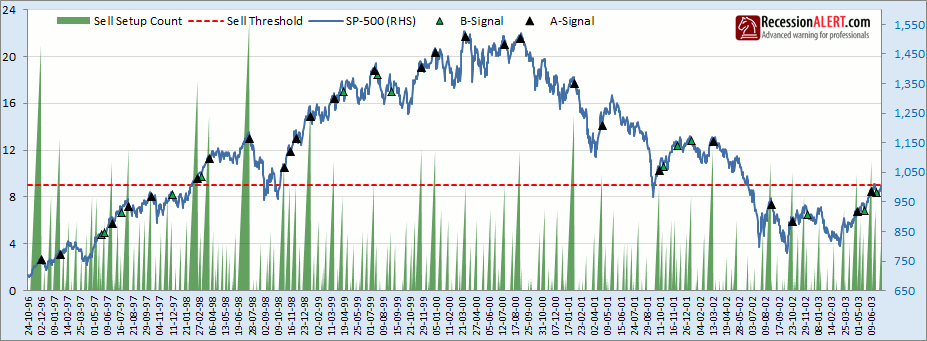
A historical catalog of Class-A and Class-B signals appears below. You will note that signals are more accurate during bull markets and thus using the Stock Market Health Index to determine if we are in a bull or bear market is an important first-step when evaluating the risk associated with DeMark signals:
E. THE SELL-SETUP ANALYSIS
An 18-year analysis of the distribution of some 509 SELL Setup Counts for the SP-500 since 1996 are depicted below:

It is interesting to note that sell-counts can go much higher than buy counts which peaked at 20. This is because market-top forming is a slow drawn-out complacency-driven process as opposed to market bottoms that are created in violent panic fashions. The old saying “The bull climbs the staircase whilst the bear descends in the elevator” comes to mind. The distribution of setups shows that the original DeMark methodology that calls for counts of 9 to be used for the Sell setups is probably the most optimal and these instances are depicted below:
As with the buy-setups, the higher the sell-setup when you encounter a bearish price flip, the better. You will note that accuracy with market tops has wider variance than that of market bottoms – the top can arrive soon after the signal or a week or two after. Also top signals have a higher rate of premature signals than the bottoms – a trait shared by most indicators that attempt to pinpoint market tops.
F. SELL SUMMATION
We can use a sell-setup summation in exactly the same fashion we did for the Buy-setup, to extract even more top signals (called B-signals) in addition to the standard Class-A top signals. The sell-setup suffers less from the price-flip whipsaw problems we observed for the buy-setup and thus there are less sell B-signals than there are buy B-signals. The B-signal SELL gets generated when the sell-setup summation is 9 or above and then drops below 9. A chronological 18-year history of A and B sell-setup signals appears below:

G. LIVE CHART
A daily chart depicting the status of all the DeMark buy & sell setup counts and summations is available in the CHARTS>TROUGH menu for subscribers as shown below. The data at the right of the chart, depicting the current trading day, is updated every 15 minutes:

The TOP PANE shows the SP-500 and the close 4 days prior (blue line) used to assess whether we have a bullish or bearish flips. The blue line is useful as it shows you during the course of the day what level the SP-500 needs to close to remain in an uptrend/downtrend or trigger a trend flip. If the SP-500 is currently trading above the blue line, we are in an up-trend and the sell-setup count will increase for the day. However if the SP-500 was above the blue line yesterday and closes below the blue line today, this signals a bearish price flip and the DeMark sell setup count will be reset to zero, triggering a SELL signal if it was above a reading of 8.
The BOTTOM PANE shows the Buy-Setup counts (red bars which are inverted negative to depict a downtrend), the Sell-Setup counts (green bars which are positive to depict we are in an uptrend) and their respective summations (solid red and green lines). A red dotted line at -8 depicts the buy-setup and summation threshold and the green dotted line at +9 depicts the sell-setup and summation threshold.
There are no BUY/SELL signals depicted on the chart itself as with our other trough charts, so you just have to become adept at reading the various signals as follows:
- BUY SETUP Class-A = Red bar at or below green dotted line and we flip to a green bar of +1
- BUY SETUP Class-B = Red line at or below green dotted line and it rises above green dotted line
- SELL SETUP Class-A = Green bar at or above red dotted line and we flip to a red bar of -1
- SELL SETUP Class-B = Green line at or above red dotted line and it falls below red dotted line
IMPORTANT NOTICE : Since 2020, we no longer display charts shown above as the Demark Setup methodology we discuss above has been replaced with a far superior Trendex methodology. You can read about our proprietary Trendex Stop & Probability methodology over here : Trendex Market Timing/Risk Management
Comments are closed.